We were chatting on FB some days back when Taps from realbeautywithtaps asked me to do a post on Blog Photography How-To... We discussed a couple of tricks and then I realised that though none of us here are professional photographers (mostly) but we all could do with some tips and tricks and make our blogs more attractive to our readers. This you see is a win-win situation for blog authors as well as readers after all we all have both roles to play very often :) So how does good photography help us? Well, if you are the author then clear and bright pictures will ensure more readers to your blog and if you are a reader then clear and bright pictures on other's blogs ensures that you get a clear and fair idea about a particular swatch or a tutorial. See? I do make sense! :P
Photography they say have five important principles:
1. Lighting
2. Composition
3. Subject
4. Background
5. Perspective
A cliche that is often used is that the most important rule of photography is that there is no rule but in order to get some attractive pictures for your blog a couple of things regarding the 5 points listed above need to be kept in mind and today we'll be covering them only in terms that may be significant to a beauty blog. Please note that this is not a photography tutorial or how-to, this article is just about some pointers that need to be kept in mind for a successful blog :)
Lighting
1. Natural light is the best light to take photograph of swatches.
2. If you are like me and get almost 0 to no time during the day for your blogging hobby, then take photographs of swatches either in white light or no light. Yellow light is a strict no-no. No light you ask... You see I have had the experience that my swatches exhibit the truest colors in 0 light (darkness) with flash on. Sometimes, with flash you do not get the true color of a swatch, then post two pics, one with flash and another without :) Simple!
3. If you are taking a pic of your look where the depiction of the true color of your eye shadow or lipstick is not important, then take pics in yellow light. Yellow light flatters our skin and gives it a flawless and a glowy effect :)
Composition
1. When reviewing a product it is important to keep the product in focus in the pic even if it means taking many pics from various angles.
 |
| See how I put focus on the box and nothing else. |
2. When clicking pictures for a particular look where you want the eye make-up, lips and the whole face to be highlighted, it is a good idea to click a pic of the eyes alone, lips alone and then maybe the whole face. This basically highlights each subject (eyes, lips, face) in your post.
3. When clicking pics in order to illustrate your make-up stick to just head shots, no point in clicking your whole torso as well :P
4. Sometimes when clicking a facial pic, it happens that you look at the camera and the pic shows you a squint (happens with me all the time). In order to avoid this turn your head a little sideways and then look at the camera. It is a more flattering angle too!
5. Pearls, shells, glass, beads, wood make for some great accessories to complement your subject.

Subject
1. Most important point under this is using the "macro" option in your cameras. It is basically depicted by a flower sign. This when switched on helps keep the subject in focus.
2. Keep in mind to not post blurred out pics. That is downright lazy and shows that you dont care enough for your blog!
Background
1. As far as possible, keep your background muted, neutral or best is white. This helps in brightening up the picture and keeping your subject in focus.
 | |
| See how the lipstick shade gets highlighted with the white background and black casing :) |
2. Try not to keep bedsheets and magazine pages as your background. They simply steal away focus from your subject. The idea is that you should not have to search for your subject in a picture.
3. Try keeping your background as plain. If you do need some texture don't get them through prints but through real objects. Like placing MAC lipsticks amongst white pearls (black stands out on white), placing a pink blush pan on a heap of rice, placing an open Red lipstick on some wooden spoons etc.

Perspective
1. Sometimes, its not the product itself but the characteristics of the product that is the subject. You need to change the perspective of your camera's lens in that case. For example when "flaunting" a newly purchased Coastal Scents palette. Here the point of focus is not the palette tray but the magnitude of colors it has right? So maybe instead of taking a front shot you may experiment with an angled shot something like this:
 | |
| NOT Attractive! |
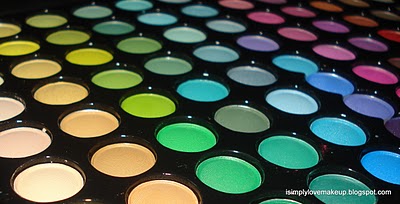 | |
| Attractive! :D |
Miscellaneous
1. Do not use a mobile phone cameras but a proper digital camera for clicking pictures.
2.When taking self shots, make it a point to click lots and lots of them from various angles. Later you can sort through them and pick the most attractive and the best out of the lot :)
3. I'll again reiterate the fact that lighting is the most important factor in making a photo appear attractive and appealing.
4. When taking a head-shot to show off your eye make-up or lip make-up be sure to not use a foundation with SPF. It makes you appear un-naturally white in flash.x
P.S. I do not claim to know much about photography, but I do know good pictures and bad picture when I see them. Also, I do not claim that the pics on my blog are perfect, far from it actually but I am learning as well :)
Do put in your comments and any pointers if you may have :)